

Why lock tokens onchain
A simple way to remember why a public lock matters is C.A.T.: Certainty, Alignment, Transparency. Every lock and its schedule are visible onchain, so every holder, from the smallest to the founder, sees the same terms. Community holders and investors can use Jupiter Lock to evaluate a project by answering fundamental questions: how much of the supply is locked, for how long, and who can change that? For token creators and project leaders, it is a way to send a strong signal to the market without relying on marketing language alone.Lock’s key concepts
Before creating or evaluating a lock, it is important to understand four concepts that define every Jupiter Lock. Vesting period: tokens unlock gradually over a set period, after the cliff. For example, a project could lock 100,000 tokens with a vesting period of 10 months, which works out to 10,000 tokens per month. The unlock frequency is configurable in minutes, days, weeks, months or years. By the end of the vesting period, all the tokens have unlocked. This gives investors clear accountability. Cliff: the initial waiting period before any tokens unlock. Building on the last example, a project could lock a total of 100,000 tokens with a cliff date 5 months out, a cliff unlock amount of 50,000 tokens, and a vesting period of 10 months. No tokens can be claimed before the cliff date. On that date, the recipient can claim the 50,000-token cliff unlock amount, and the remaining 50,000 tokens unlock over the following 10 months (5,000 tokens per month). Every lock has a cliff date, but the cliff unlock amount is optional. Set it to the full amount and everything unlocks at once on the cliff date. Recipient address: the wallet that can claim the tokens as they unlock. In most cases, this is an investor’s or a team member’s wallet. Recipients claim their unlocked tokens manually on lock.jup.ag, following the cliff and vesting schedule; nothing is sent automatically. Each lock serves exactly one recipient, so several recipients need one lock each. Permissions: who controls the lock after its creation, a critical detail to judge whether stakeholders are here for the long haul. There are two settings, “Who can cancel the contract?” and “Who can change the recipient?”. For each one, the creator picks None, Only Creator, Only Recipient, or Creator or Recipient (either of them can act alone). Both default to None, and neither can be changed once the lock exists. If both are set to None, the lock is fully irreversible: nobody can cancel it or change its recipient. The vesting terms themselves (token, amount, cliff, duration and frequency) can never be changed after creation.Associated risks
As a viewer, the main risk is misunderstanding the project’s tokenomics. Analyze each lock’s vesting period, cliff, recipient and permissions. Pay particular attention to whether the lock can be canceled: a lock that its creator can cancel at any time offers much weaker guarantees than a fully irreversible one, where both permissions are set to None. Keep in mind too that a lock only manages the escrow and the schedule: it does nothing if the token itself loses its value or liquidity. The Jupiter Lock program is also upgradeable, with updates reserved for critical fixes. As a creator, the main risk is misconfiguring the lock. The vesting terms are permanent once the lock is created: an incorrect amount, cliff or vesting duration cannot be fixed. A wrong recipient address can only be fixed if the lock lets you, the creator, change the recipient or cancel it. Always review the full Lock Summary carefully before you create the lock.Using Jupiter Lock
As a viewer
1
Find the locks
Go to lock.jup.ag and use the search bar to look up a token or a wallet. A token’s page lists the locks for that token; a wallet’s page lists the tokens locked for it and the locks it created.
2
Review each lock
Open a lock to see its full details: creator, recipient wallet, status (Upcoming, Active, Completed or Cancelled), cliff date and cliff amount, vesting schedule, tokens claimed so far, and who can cancel the lock or update its recipient.
3
Claim, if you are the recipient
Only the recipient wallet can claim. Connect it, open Your Locked Tokens, and select Claim on the lock to transfer its unlocked tokens to your wallet. Unclaimed tokens stay in escrow indefinitely, with no deadline.

A lock as listed on lock.jup.ag. Claim works only for the recipient wallet.
As a creator
1
Start a lock
Go to lock.jup.ag, connect your wallet, and select Create Lock at the top of the site.
2
Choose the token
Select the token you wish to lock. Jupiter Lock supports SPL tokens.
3
Set the amount and recipient
Give the lock a title, enter the Total Lock Amount, and enter the recipient’s wallet address.
4
Set the schedule
Define the Cliff Date, the optional Cliff Unlock Amount, the Vesting Duration and the Unlock Frequency.
5
Set the permissions
Answer “Who can cancel the contract?” and “Who can change the recipient?” by deciding whether nobody, you, the recipient, or either of you will have that right.
6
Review and create
Review the Lock Summary, select Create Contract, confirm, and approve the transaction in your wallet. As each lock serves a single recipient, create one lock per recipient.
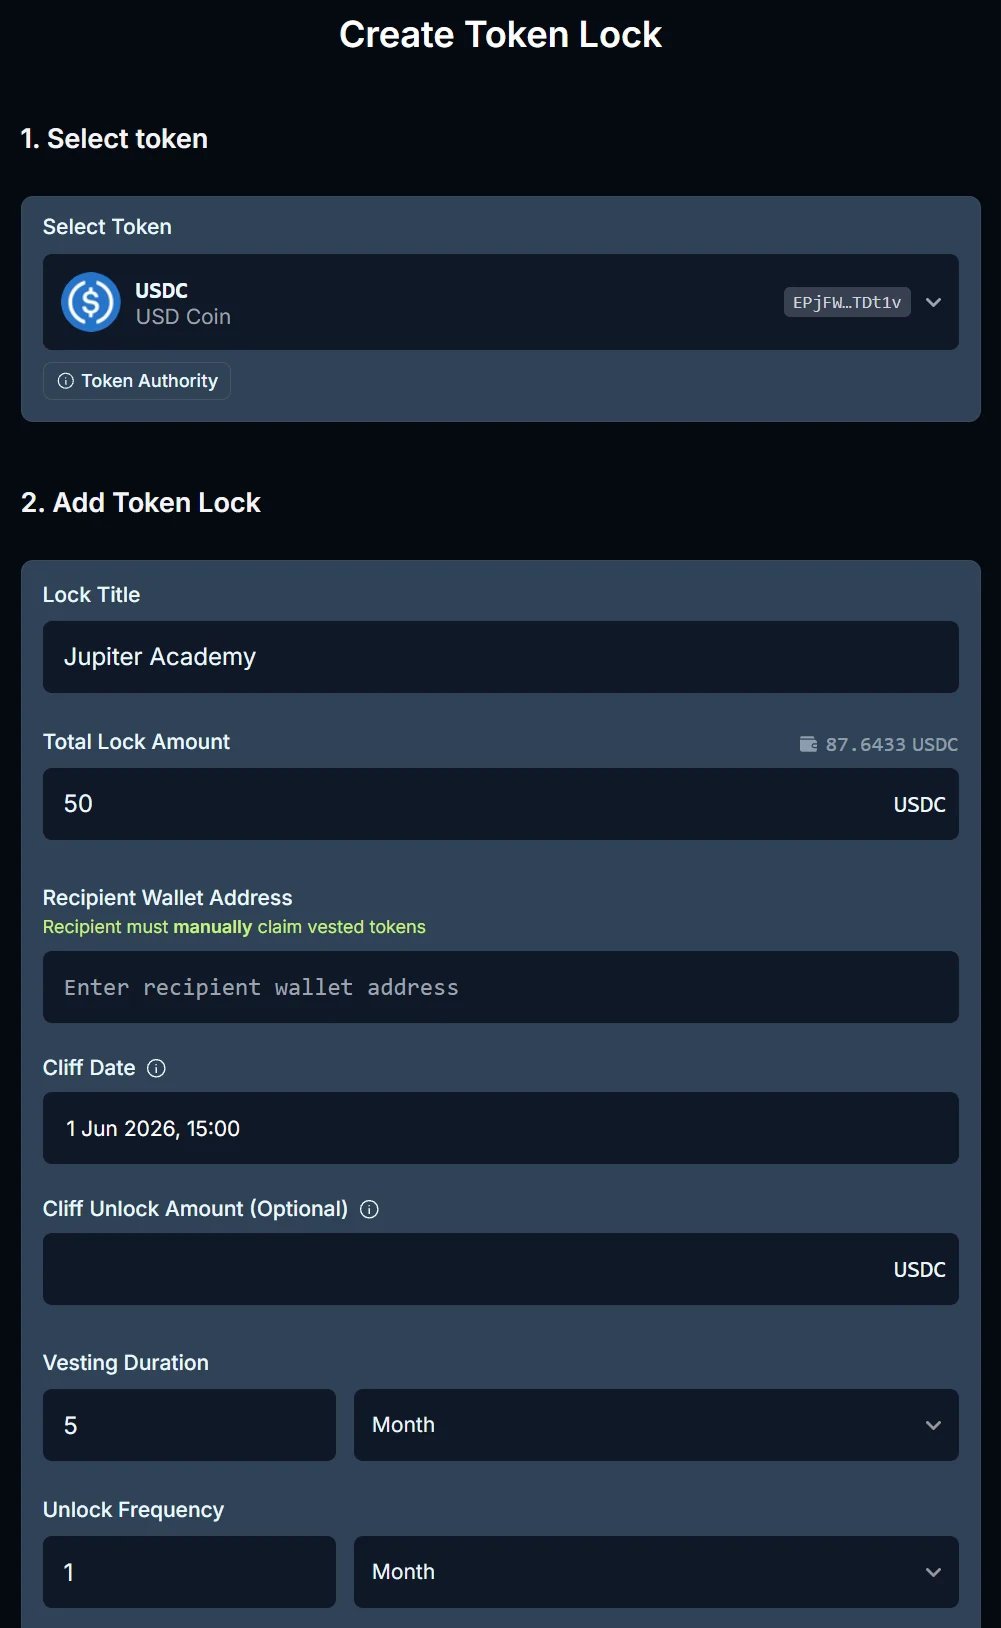
The first fields of the Create Token Lock form on lock.jup.ag. The permission settings and the Lock Summary come further down.
Go deeper
How Jupiter Lock works
Vesting model, every lock parameter, permissions, claiming and risks.
Jupiter Lock FAQ
Quick answers on creating locks, claiming and security.